'Developer's Infos/Linux Programming'에 해당되는 글 9건

  1. 2011.09.30 [Linux] asmlinkage
  2. 2011.09.06 [Shared Memory] shmget() 공유 메모리 생성
  3. 2011.09.05 PCI Driver Flow
  4. 2011.09.01 [IP] IPv6 헤더, IPv4 vs IPv6
커널 소스를 보다보면 asmlinkage로 선언된 함수들을 볼 수 있다.
asmlinkage는 어셈블리 코드에서 직접 호출(링크)할 수 있다는 의미이며
커널 소스의 <include/linux/linkage.h>에 다음과 같이 정의되어 있다.

#include <linux/config.h>
#include <asm/linkage.h>

#ifdef __cplusplus
#define CPP_ASMLINKAGE extern "C"
#else
#define CPP_ASMLINKAGE
#endif

#ifndef asmlinkage
#define asmlinkage CPP_ASMLINKAGE
#endif

...

그렇다면 어셈블리 코드에서 직접 호출할 수 있다는 것은 무엇을 의미할까?
일반적으로 C 함수는 어셈블리 코드에서 별 어려움없이 호출할 수 있지만
함수의 인자를 넘기거나 리턴값을 받는 부분 등의 호출 규약이 필요하다.

레지스터에 여유가 있는 ARM이나 MIPS 등의 아키텍처에서는
함수의 인자를 넘길 때 특정 레지스터를 사용하도록 호출 규약이 정의되어 있지만,
그렇지 못한 x86 아키텍처에서는 때에 따라 레지스터, 스택 혹은 별도의 메모리 영역에
함수의 인자를 저장하여 넘길 수 있도록 지원한다.

당연히 인자를 레지스터에 저장하여 넘기는 방식이 빠르기 때문에 (fastcall)
최적화 옵션을 켜고 컴파일하는 경우 인자를 레지스터를 통해 전달하도록
함수의 호출부와 구현부를 변경해 버릴 수 있다. (일반적인 최적화 방법)
이 경우 GCC를 통해 자동 생성되는 코드는 적절히 변환되므로 문제가 없을테지만
직접 작성한 어셈블리 코드에서 함수를 호출하는 경우 문제가 발생하게 된다.

이 경우를 방지하기 위해 어셈블리 코드와 링크되는 함수는
인자를 (레지스터를 이용하지 않고) 스택을 이용해서 전달하도록
선언하는 데, 이 때 asmlinkage가 사용된다.

위의 코드에서 <asm/linkage.h> 파일을 #include 하고 있는 것에 주의하자.
대부분의 아키텍처에서 이 파일은 asmlinkage를 정의하지 않지만
i386에서는 다음과 같이 정의한다.

#define asmlinkage CPP_ASMLINKAGE __attribute__((regparm(0)))
#define FASTCALL(x) x __attribute__((regparm(3)))
#define fastcall __attribute__((regparm(3)))

regparm 속성은 레지스터를 이용하여 전달한 인자의 수를 지정한다.
asmlinkage로 선언된 경우 모두 스택을 이용하고 (레지스터로 0개의 인자 전달)
fastcall로 선언된 경우 최대 3개의 인자를 레지스터로 전달한다.
(이 경우 EAX, EDX, ECX 레지스터를 이용하며, 인자는 정수형이어야 한다.)


출처 :  
http://studyfoss.egloos.com
Posted by 삼성동고양이

간략하게 정리가 잘 되어 있어서 퍼옴

설명

shmget() 함수는 공유 메모리를 생성합니다.

공유 메모리는 단어 뜻에서 알 수 있듯이 하나의 프로세스에서가 아니라 여러 프로세스가 함께 사용하는 메모리를 말합니다. 이 공유 메모리를 이용하면 프로세스끼리 통신을 할 수 있으며, 같은 데이터를 공유할 수 있습니다.

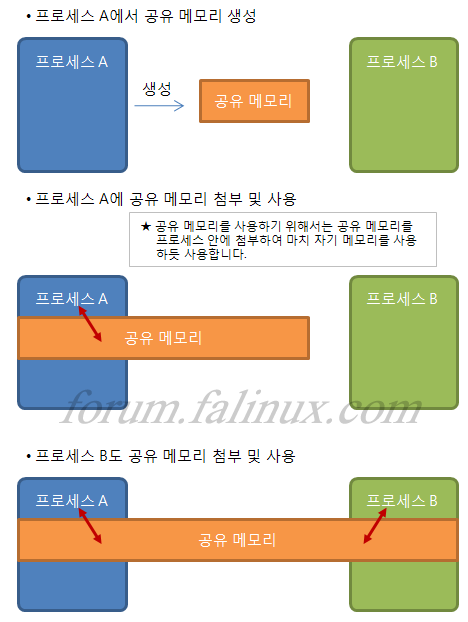
이렇게 같은 메모리 영역을 공유하기 위해서는 공유 메모리를 생성한 후에 프로세스의 자신의 영역에 첨부를 한 후에 마치 자신의 메모리를 사용하듯 사용합니다.

즉, 공유 메모리를 사용하기 위해서는 공유 메모리를 생성한 후에, 이 메모리가 필요한 프로세스는 필요할 때 마다 자신의 프로세스에 첨부를 한 후에 다른 메모리를 사용하듯 사용하면 되겠습니다.

헤더

#include <sys/ipc.h>
#include <sys/shm.h>

형태 int shmget(key_t key, int size, int shmflg);
인수
key_t key 공유 메모리를 구별하는 식별 번호
int size 공유 메모리 크기
int shmflg 동작 옵션
shmflg 옵션 내용
IPC_CREATE key에 해당하는 공유 메모리가 없다면 새로 생성한다. 만약있다면 무시하며 생성을 위해 접근 권한을 지정해 주어야 한다.
IPC_EXCL 공유 메모리가 이미 있다면 실패로 반환하며 공유 메모리에 접근하지 못한다. 이 옵션이 없어야 기존 공유 메모리에 접근할 수 있다.
반환
-1 실패
-1 이외 공유 메모리 생성 성공, 공유 메모리 식별자

예제

예제를 위해 두 개의 프로세스를 만들겠습니다. counter.c 는 공유 메모리에 1초 마다  0부터 계속 증가하는 카운터 문자열을 공유 메모리에 넣으면 show_counter.c에서 공유 메모리를 화면에 출력하도록 하겠습니다.

// counter.c   공유 메모리를 생성하고 공유 메모리에
// 카운터 문자열을 계속 갱신하여 넣습니다.

#include <stdio.h>      // printf()
#include <unistd.h>     // sleep()
#include <sys/ipc.h>
#include <sys/shm.h>

#define  KEY_NUM     9527
#define  MEM_SIZE    1024

int main( void)
{
   int   shm_id;
   void *shm_addr;
   int   count;

   if ( -1 == ( shm_id = shmget( (key_t)KEY_NUM, MEM_SIZE, IPC_CREAT¦0666)))
   {
      printf( "공유 메모리 생성 실패\n");
      return -1;
   }

   if ( ( void *)-1 == ( shm_addr = shmat( shm_id, ( void *)0, 0)))
   {
      printf( "공유 메모리 첨부 실패\n");
      return -1;
   }

   count = 0;
   while( 1 )
   {
      sprintf( (char *)shm_addr, "%d", count++);       // 공유 메모리에 카운터 출력
      sleep( 1);
   }
   return 0;
}

// show_counter.c   counter.c가 공유 메모리에 넣는
// 카운터 문자열을 화면에 계속 출력합니다.

#include <stdio.h>      // printf()
#include <unistd.h>     // sleep()
#include <sys/ipc.h>
#include <sys/shm.h>

#define  KEY_NUM     9527
#define  MEM_SIZE    1024

int main( void)
{
   int   shm_id;
   void *shm_addr;

   if ( -1 == ( shm_id = shmget( (key_t)KEY_NUM, MEM_SIZE, IPC_CREAT¦0666)))
   {
      printf( "공유 메모리 생성 실패\n");
      return -1;
   }

   if ( ( void *)-1 == ( shm_addr = shmat( shm_id, ( void *)0, 0)))
   {
      printf( "공유 메모리 첨부 실패\n");
      return -1;
   }

   while( 1 )
   {
      printf( "%s\n", (char *)shm_addr);    // 공유 메모리를 화면에 출력
      sleep( 1);
   }
   return 0;
}
]$ gcc counter.c -o counter          
]$ gcc show_counter.c -o show_counter
]$ ./counter &
[1] 8077
]$ ./show_counter
2
3
4
5
6
7
8 :


'Developer's Infos > Linux Programming' 카테고리의 다른 글

add_wait_queue()/remove_wait_queue()/schedule() 설명 및 사용법  (0) 2011.10.10
__attribute__  (0) 2011.10.10
[Linux] asmlinkage  (0) 2011.09.30
PCI Driver Flow  (0) 2011.09.05
[IP] IPv6 헤더, IPv4 vs IPv6  (0) 2011.09.01
Posted by 삼성동고양이
1. Fill up the pci_device_id table as follows.

static const struct pci_device_id pci_ids[] = {
{
.vendor = VENDOR_ID,
.device = DEVICE_ID,
.subvendor = PCI_ANY_ID,
.subdevice = PCI_ANY_ID,
.driver_data = (unsigned long) ~HOST_FORCE_PCI,
},

{   /* all zero 's */ },
};

2. This pci_device_id structure needs to be exported to user space to allow the hotplug
and module loading systems know what module works with what hardware devices.
The macro MODULE_DEVICE_TABLE accomplishes this.

An example is:
MODULE_DEVICE_TABLE(pci, pci_ids);

3. Fill the standard PCI_Driver structure with the PCI_id table,probe and remove functions.

say for example:

static struct pci_driver mypci_driver = {
.name       =  DRIVER_NAME,
.id_table    = pci_ids,
.probe       =  mypci_probe,
.remove     = __devexit_p(mypci_remove),
.suspend    = NULL,
.resume     = NULL,
};

 The main structure that all PCI drivers must create in order to be registered with the kernel properly is the struct pci_driver structure. This structure consists of a number of function callbacks and variables that describe the PCI driver to the PCI core.

4. Registering a PCI Driver:

**To register the struct pci_driver with the PCI core, a call to pci_register_driver (for network register_netdev,for char misc_register,for block drivers register_blkdev) is made with a pointer to the struct pci_driver.

**This is traditionally done in the module initialization code for the PCI driver:

static int pci_init(void)
{
PRINT(" \n\nPCI DRIVER IS LOADED IN KERNEL SPACE \n\n");
return pci_register_driver(&mypci_driver);
}

**Note that the pci_register_driver function either returns a negative error number
or 0 if everything was registered successfully.

5.Accessing PCI configuration space:

The configuration space can be accessed through 8-bit, 16-bit, or 32-bit data transfers at any time.
The relevant functions are prototyped in <linux/pci.h>:

int pci_read_config_byte(struct pci_dev *dev, int where, u8 *val);
int pci_read_config_word(struct pci_dev *dev, int where, u16 *val);
int pci_read_config_dword(struct pci_dev *dev, int where, u32 *val);
int pci_write_config_byte(struct pci_dev *dev, int where, u8 val);
int pci_write_config_word(struct pci_dev *dev, int where, u16 val);
int pci_write_config_dword(struct pci_dev *dev, int where, u32 val);

6. Enabling the PCI Device:

**In the probe function for the PCI driver, before the driver can access any device resource
(I/O region or interrupt) of the PCI device, the driver must call the pci_enable_device
function:

**int pci_enable_device(struct pci_dev *dev);

**This function actually enables the device. It wakes up the device and in some cases also assigns its interrupt line and I/O regions.

struct pci_dev {
        struct list_head global_list;   /* node in list of all PCI devices */
        struct list_head bus_list;      /* node in per-bus list */
        struct pci_bus  *bus;           /* bus this device is on */
        struct pci_bus  *subordinate;   /* bus this device bridges to */

        void            *sysdata;       /* hook for sys-specific extension */
        struct proc_dir_entry *procent; /* device entry in /proc/bus/pci */

        unsigned int    devfn;          /* encoded device & function index */
        unsigned short  vendor;
        unsigned short  device;
        unsigned short  subsystem_vendor;
        unsigned short  subsystem_device;
        unsigned int    class;          /* 3 bytes: (base,sub,prog-if) */
        u8              hdr_type;       /* PCI header type (`multi' flag masked out) */
        u8              rom_base_reg;   /* which config register controls the ROM */
        u8              pin;            /* which interrupt pin this device uses */

        struct pci_driver *driver;      /* which driver has allocated this device */
        u64             dma_mask;       /* Mask of the bits of bus address this
                                           device implements.  Normally this is
                                           0xffffffff.  You only need to change
                                           this if your device has broken DMA
                                           or supports 64-bit transfers.  */

        pci_power_t     current_state;  /* Current operating state. In ACPI-speak,
                                           this is D0-D3, D0 being fully functional,
                                           and D3 being off. */

        pci_channel_state_t error_state;        /* current connectivity state */
        struct  device  dev;            /* Generic device interface */

        /* device is compatible with these IDs */
        unsigned short vendor_compatible[DEVICE_COUNT_COMPATIBLE];
        unsigned short device_compatible[DEVICE_COUNT_COMPATIBLE];

        int             cfg_size;       /* Size of configuration space */

        /*
         * Instead of touching interrupt line and base address registers
         * directly, use the values stored here. They might be different!
         */
        unsigned int    irq;
        struct resource resource[DEVICE_COUNT_RESOURCE]; /* I/O and memory regions + expansion ROMs */

        /* These fields are used by common fixups */
        unsigned int    transparent:1;  /* Transparent PCI bridge */
        unsigned int    multifunction:1;/* Part of multi-function device */
        /* keep track of device state */
        unsigned int    is_enabled:1;   /* pci_enable_device has been called */
        unsigned int    is_busmaster:1; /* device is busmaster */
        unsigned int    no_msi:1;       /* device may not use msi */
        unsigned int    block_ucfg_access:1;    /* userspace config space access is blocked */

        u32             saved_config_space[16]; /* config space saved at suspend time */
        struct hlist_head saved_cap_space;
        struct bin_attribute *rom_attr; /* attribute descriptor for sysfs ROM entry */
        int rom_attr_enabled;           /* has display of the rom attribute been enabled? */
        struct bin_attribute *res_attr[DEVICE_COUNT_RESOURCE]; /* sysfs file for resources */
};


7.Enabling the PCI-Bus mastering for the device by calling pci_set_master Kernel API.
  This API enables bus-mastering on the device and calls pcibios_set_master  to do the needed arch specific settings
  It is done in the driver,if it is needed.

**BusMastering:
bus mastering is the capability of devices on the PCI bus (other than the system chipset, of course) to
  take control of the bus and perform transfers directly.PCI's design allows bus mastering of multiple devices on the bus simultaneously,
  with the arbitration circuitry working to ensure that no device on the bus (including the processor!) locks out any other device.
  At the same time though, it allows any given device to use the full bus throughput if no other device needs to transfer anything.

**PCI transactions work in a master-slave relationship. A master is an agent that initiates a transaction (can be a read or a write).
While the host CPU is often the bus master, all PCI boards can potentially claim the bus and become a bus master.

**When a PCI device is enabled, it's bus mastering is also enabled.  This occurs before any driver code is
executed.

8. Accessing Memory Regions

**unsigned long pci_resource_start(struct pci_dev *dev, int bar);
The function returns the first address (memory address or I/O port number)
associated with one of the six PCI I/O regions. The region is selected by the integer
bar (the base address register), ranging from 0–5 (inclusive).

**unsigned long pci_resource_end(struct pci_dev *dev, int bar);
The function returns the last address that is part of the I/O region number bar.
Note that this is the last usable address, not the first address after the region.

**unsigned long pci_resource_flags(struct pci_dev *dev, int bar);
This function returns the flags associated with this resource.
All resource flags are defined in <linux/ioport.h>; the most important are:
IORESOURCE_IO
IORESOURCE_MEM ( if the resource type is memory resource, then we can access the register by means of readl/b/w/writel/b/w functions)

#define pci_resource_start(dev,bar)   ((dev)->resource[(bar)].start)
#define pci_resource_end(dev,bar)     ((dev)->resource[(bar)].end)
#define pci_resource_flags(dev,bar)   ((dev)->resource[(bar)].flags)
#define pci_resource_len(dev,bar) \
        ((pci_resource_start((dev),(bar)) == 0 &&       \
          pci_resource_end((dev),(bar)) ==              \
          pci_resource_start((dev),(bar))) ? 0 :        \
                                                        \
         (pci_resource_end((dev),(bar)) -               \
          pci_resource_start((dev),(bar)) + 1))

9.Reserving the PCI I/O and memory regions.

int pci_request_region (struct pci_dev * pdev, int bar, char * res_name);

Arguments:
pdev
    PCI device whose resources are to be reserved
bar
    BAR to be reserved
res_name
    Name to be associated with resource.

Description
Mark the PCI region associated with PCI device pdev BR bar as being reserved by owner res_name.
Do not access any address inside the PCI regions unless this call returns successfully.

10. Converting physical address to virtual address.

pci.pVirtualBaseAddr=(unsigned int *)ioremap_nocache(pci.PciBaseStart,pci.length);

11.

else
    KERNELDIR ?= /lib/modules/$(shell uname -r)/build
    PWD  := $(shell pwd)
default:
    $(MAKE) -C $(KERNELDIR) M=$(PWD) modules
Endif


static struct miscdevice miscdev= {
        /*
         * We don't care what minor number we end up with, so tell the
         * kernel to just pick one.
         */
        MISC_DYNAMIC_MINOR,
        /*
         * Name ourselves /dev/UniPro.
         */
        "miscdev",
        /*
         * What functions to call when a program performs file
         * operations on the device.
         */
        &fops
};

misc_register(&miscdev);

출처 : http://inbasudhakar.blogspot.com/2011/08/pci-driver-flow.html 
Posted by 삼성동고양이

○ IPv4 헤더 vs IPv6 헤더

 IPv4 IPv6   변경 내용
 VERSION  VERSION
 HLEN  X (삭제)  IPv6 기본 헤더의 사이즈는 fixed 40 bytes 
 TOS  CLASS  
 Total Length  Payload Length  IPv6 기본 헤더 40 bytes를 제외한 length (8 bytes = 1로 표현)
 Identification  Fragment Header  IPv6 Fragment Extension 헤더로 대체
 Flags  Fragment Header  IPv6 Fragment Extension 헤더로 대체
 Fragment Offset  Fragment Header  IPv6 Fragment Extension 헤더로 대체
 TTL  Hop Limit  
 Protocol  Next Header (N.H)  IPv6 기본 헤더 다음에 올 extension 헤더 또는 upper Layer (TCP/UDP/ICMPv6) 헤더 종류를 명시
 Checksum  X (삭제)  hop을 거칠 때마다 TTL값을 감소시키고 checksum이 재계산 되는
 비효율성을 없애고 layer2를 신뢰함. 
 upper layer에서 checksum 필드를 사용하도록 권장함
 SRC Address  SRC Address  IPv6 에서 128 bits 주소 체계로 확장
 DST Address  DST Address  IPv6 에서 128 bits 주소 체계로 확장


○ IPv6 패킷의 구성


: IPv6 헤더는 여러 확장 헤더와 upper layer들이 Next Header 필드 값을 통해 연결될 수 있다.
  Next Header 필드는 다음에 올 헤더의 종류를 명시한다.

○ IPv6 확장 헤더
: 확장 헤더에는 다음에 올 헤더 또는 upper layer를 명시하는 next header(8 bits) 필드와 hdr length(8 bits) 
  필드가 일반적으로 존재한다. (fragment extension header는 고정 크기 이므로 예외)
  hdr length는 Next Header, hdr length 필드를 제외한 확장 헤더의 사이즈를 나타낸다. 
  (8 bytes = 1로 사이즈 표현)
  fragment extension 헤더는 고정된 사이즈인 (64 bits)의 크기를 갖는다.

○ IPv6 확장 헤더의 종류

1) Hop by Hop Extension Header
2) Destination Extension Header

* MLD : Multicat Listener Discovery

3) Routing Extension Header

- path segments : 남아있는 거쳐가야 할 router의 개수
- strict/loose bit mask
  strict bit : 정해진 router 경로 이외에 다른 router가 중간에 끼어 있을 경우 packet forwarding을 포기하고 
                ICMP 메시지를 되돌려 줌
  loose bit : 중간에 다른 router가 존재해도 packet forwarding을 수행


4) Fragment Extension Header
: IPv6의 Fragment Extension Header의 사이즈는 8 bytes로 고정되어 있음
- Fragment Offset : Original 데이터의 offset, N x 8 bytes 로 표현됨. N 이 offset 값을 가짐.
- Mark (1 bit) : 0 이면 Unfragmented 패킷 또는 fragmented 마지막 패킷, 1 이면 중간의 fragmented 패킷을 의미
- Identification : fragmented 패킷에 대해 동일한 ID를 가짐

5) Authentication Extension Header (AH)
- Security Parameters Index : Source와 Destination 간의 Security Association (단방향)
- Sequence Number : replayed packet 공격을 방지하기 위한 counter
- Authentication Data : packet의 위/변조에 대한 integrity를 검사하기 위한 hash (MD5 & SHA-1)
                                중간에 packet이 router에 의해 변하기 쉬운 필드를 제외하고는 모두 hash되어진다.
                                (아래 그림에서 노란색 부분이 authentication 대상 데이터이다.)

6) Encapsulating Security Payload Header (ESP)
: ESP 확장 헤더는 payload를 암호화 하는데 사용되며 AH 확장 헤더와는 독립적이다. 
  즉 AH 확장 헤더와 ESP 확장 헤더가 함께 사용될 수 있다.
- Security Parameters Index : Source와 Destination 간의 Security Association (단방향)
- Sequence Number : replayed packet 공격을 방지하기 위한 counter
- Next Header : 일반적으로 암호화되는 payload의 프로토콜 타입을 명시한다. (TCP/UDP...)

ESP 확장 헤더를 포함한 패킷은 다음과 같이 구성될 수 있다.

출처 : 
http://ryujeen.tistory.com/132
Posted by 삼성동고양이
이전버튼 1 2 이전버튼